本帖最后由 ntwuhui 于 2016-6-6 23:06 编辑
1. 描述
MindCub3r 是一个由一套乐高头脑风暴EV3家庭版套件(31313)或者一套EV3教育版核心和扩展套件(45544+45560)搭建而成并用于解决著名的魔方问题的机器人。
所有MindCub3r版本软件可以在EV3固件版本为 v1.06H (家庭) 和 v1.06E (教育)及以上版本工作。建议EV3固件更新到乐高发布的最新版本。
请仔细按照 搭建方案 (家庭版) 或者 搭建方案 (教育版) 构建机器人,下载并安装下面所描述的软件。
MindCub3r 软件主要由三个部分组成:
- 一个项目文件: MindCub3r-v2p1.ev3 或 MindCub3r-Ed-v2p1.ev3,一个使用标准乐高MINDSTORMS EV3 图形化编程环境创建的包含电机和传感器的控制程序。
- 一个可执行程序: mc3solver-v2p1.rtf, 编译自一个用C++实现的高效求解算法程序,通过这个程序可以找到比NXT MindCuber变种更高效的解决方法。
- 一个EV3应用程序: "MC3 Solver v2p1", 用来启动mc3solver-v2p1.rtf可执行程序。
主程序和mc3solver-v2p1.rtf可执行程序通过位于EV3内的共享文件进行通信。(PS:详细通信原理参考这里——译者注)
注意: v2p1发行版之所以使用.rtf扩展名,是为了允许使用标准乐高MINDSTORMS EV3软件下载该文件。 该.rtf文件的使用目的是为了一个包含文本的文件(PS:mc3.rtf,内含通信指令),因此使用.rtf文件其实是围绕这一文本文件,并作为一个可执行程序来运行的。请不要尝试使用文本编辑工具打开这个文件。
MindCub3r使用了一个位于RGB模式下的EV3颜色传感器模块, 它可以测量即便使用标准乐高MINDSTORMS EV3软件中提供的标准颜色模式的颜色传感器都无法区分的色彩。这个RGB模式的EV3颜色传感器模块必须导入到乐高MINDSTORMS EV3软件中来支持这个模式。
2. 软件
注意: 使用下面的下载链接:- Windows - 在链接上右击
- Mac - 点击链接时按住控制(ctrl)键
从弹出的菜单中选择
- 链接另存为...
- 目标另存为..
- 下载链接文件为...
然后从你的计算机中选择一个文件夹来保存这个文件。
2.1 安装颜色传感器模块- 下载 模块ColorSensorRGB-v1.00.ev3b到你的计算机中。注意一下这个文件在下载过程中或许会重命名为ColorSensorRGB-v1.00.zip。 如果发生这样的情况,请重新改名为ColorSensorRGB-v1.00.ev3b。
- 启动乐高MINDSTORMS EV3软件并创建一个新的空项目文件。
- 选择工具菜单下的模块导入向导。

- 在模块导入与导出向导对话框中,选择浏览按钮。

- 在计算机中找到文件ColorSensorRGB-v1.00.ev3b并打开它。

- 从选择模块导入列表中选择ColorSensorRGB-v1.00.ev3b,然后选择导入按钮。

- 为完成安装,关闭对话框并退出乐高MINDSTORMS EV3软件。
2.2 下载MindCub3r程序- 将相应的文件下载到计算机:
注: 以前的版本在这里下载。 - 从压缩包中解压所有的文件。在一台运行Windows的计算机中,找到Windows资源管理器中的文件,单击右键并选择 解压到... 压缩包中包含:
- 项目主程序MindCub3r-v2p1.ev3 或 MindCub3r-Ed-v2p1.ev3
- 可执行程序mc3solver-v2p1.rtf
- 安装文件InstallMC3-v2p1.rbf 用来启动 mc3solver-v2p1.rtf
- 开启LEGO MINDSTORMS EV3 软件,选择 文件 菜单,然后 打开项目。
- 找到项目文件MindCub3r-v2p1.ev3 或 MindCub3r-Ed-v2p1.ev3 并打开。
- 下载 MindCub3r 程序到EV3中 (但不要运行它)。
 - 选择 工具 菜单并打开 内存浏览器。
 - 选择 程序块 (或 SD 卡,如果EV3中有一个微型SD卡的话) ,在项目文件夹中找到并选择 MindCub3r-v1p9 或 MindCub3r-Ed-v1p9 ,然后选择 下载 。
  - 在计算机中找到 MindCub3r-v2p1.zip 或 MindCub3r-Ed-v2p1.zip 解压后的文件。选择 mc3solver-v2p1.rtf , 打开并下载程序到EV3中。
 - 从内存浏览器中再次选择 下载。
- 在计算机中找到 MindCub3r-v2p1.zip 或 MindCub3r-Ed-v2p1.zip 解压后的文件。选择 InstallMC3-v2p1.rbf, 打开并下载文件到EV3中。
 - 关闭内存浏览器对话框。
2.3 安装MC3 Solver应用- 转到EV3第一个屏:最近运行。
 - 通过按EV3上的右移按钮到 文件导航 屏幕。选择MindCub3r-v2p1或MindCub3r-Ed-v2p1文件夹并按下中间的按钮打开它。如果有一个迷你SD卡插在EV3内,首先选择SD_Card文件夹并打开它。
  - 使用向下按钮选择InstallMC3-v2p1并按下中间按钮执行它。EV3将会发出“哔”的一声。
 - "MC3 Solver v2p1"应用程序将会安装在 程序块应用 屏幕内。
 - 关闭EV3程序块并确认所有文件均已保存在闪存内,然后再次打开它。
MindCub3r 现在准备完毕!
3. 操作- 从EV3的 程序块应用 下面执行"MC3 Solver v2p1"应用程序,启动mc3solver-v2p1.rtf可执行程序。
- 在每次打开EV3时,这个程序仅需要执行一次,然后程序会一直在后台持续运行,直到EV3被关闭。
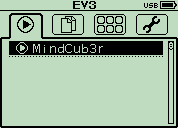
- 从 最近运行 或者 文件导航 屏幕下面运行MindCub3r应用程序,首次运行从 文件导航 下执行。
  - The program first resets the position of the scan arm (holding the color sensor) and then the tilt arm. If the turntable starts to rotate or the two arms do not move in this order, please carefully check that cables have been connected to the correct ports on the EV3 as shown by the color coding in the build instructions. During this period, the EV3 buttons flashes red.
The program then connects to the mc3solver-v2p1.rtf program that was downloaded to the EV3. If the program is found, the EV3 makes a short beep and continues. If the solver program is not running, the buttons continues to flash red and the message "Find solver" is displayed on the EV3 screen. If this happens, please check that the "mc3solver-v2p1.rtf" program has been downloaded to the MindCub3r-v2p1 or MindCub3r-Ed-v2p1 project folder on the EV3 and that the "MC3 Solver v2p1" application has been installed and run once.
When MindCub3r is ready to start, the EV3 buttons turn orange and the message "Insert cube..." is displayed on the screen. - Gently turn the turntable in each direction with your finger so that it moves slightly because of "play" in the gears connecting it to the motor. If necessary, adjust the position of the motor so that there is an equal mount of play in each direction. Use the left and right buttons on the EV3 to do this. A short press nudges the motor by a small angle. Holding the button for longer moves it by larger angles more quickly.
- Insert a scambled Rubik's Cube into the turntable tray and MindCub3r will start to scan and solve the cube.
MindCub3r may scan the cube up to three times if it is unable to determine the colors at first. If the scanned colors do not result in a valid pattern, MindCub3r will stop after the third attempt and display the message "Scan error" on the EV3 display. If this happens, there may be a number of possible causes. See the troubleshooting section. - MindCub3r can solve the cube directly into patterns or scramble it. Before inserting the cube, use the up and down buttons on the EV3 to select a specific pattern, "All" to create each pattern in turn or "Random" to cause MindCub3r to solve normally and occasionally generate a random pattern. Selecting "Scramble" will make MindCub3r scramble the cube without scanning it.
If there is a cube present before MindCub3r is ready, the buttons will stay red and the message "Remove cube..." is displayed for you to remove the cube. If this happens even when no cube is present or if MindCub3r does not start to scan the cube when it is inserted, please check that the cables to the infra red or ultrasonic and color sensors are connected to the correct ports on the EV3 as shown in by the color coding in the build instructions.
4. 故障排除提示
4.1 一般情况
The video of the home variant of MindCub3r shows a prototype. The scan arm support was improved before the build instructions were published so do not worry if your MindCub3r does not look quite like the video. There are many other videos of MindCub3r built by other people in this playlist
4.2 翻转
If MindCub3r fails to tilt the cube correctly the following tip may help:
- Check that the tilt arm has been built exactly as shown in the build instructions. In particular, carefully check the position of the grey connectors and pegs that connect the tilt arm to the levers from the tilt motor.
4.3 扫描
If MindCub3r attempts to scan the cube 3 times and displays the message "Scan error" the following tips may help.
- MindCub3r is designed to work with an official Rubik's Cube branded by Rubik's. However, it should work with most cubes provided one set of stickers is white and the others are distinct colors. It is optimized to work with white, yellow, red, orange, green and blue stickers.
NOTE: cubes with very bright, vivid, "fluorescent" stickers may not scan reliably because the LEGO color sensor can return similar values for colors that look different to us. If none of the other tips help and you think this may be an issue, please consider replacing the stickers with more conventional colors or try an alternative cube. - Cubes with a white plastic body may scan less reliably that those with a black body but may work reasonably well if there are no other issues.
- A standard cube is about 57mm along each edge. MindCub3r will work most reliably with a cube this size although cubes that are only slightly larger or smaller may work. It has been known to solve some cubes as small as 55mm but not all.
- Make sure latest version of the EV3 firmware from LEGO is installed on the EV3.
- Make sure latest release of the MindCub3r software is installed.
- Check that the scan arm has been built exactly as shown in the build instructions. Small differences such as how the black 5-hole beams on either side of the scan arm are connected can alter the position of the color sensor during the scan or even jam the scan arm so it stops during the scan. In particular, if the color sensor looks as though it is over the edge of the cube or too close to the middle while scanning the corner or edge, please check the build instructions again.
- Even if the cube appears to tilt each time during the scan, it may be that the cube is being pushed too far across the turntable affecting its position under the color sensor. Check that the tilt arm has been built exactly as shown in the build instructions. In particular, carefully check the position of the grey connectors and pegs that connect the tilt arm to the levers from the tilt motor.
- If the EV3 is positioned one hole too far towards the turntable, the corner of the turntable may catch on the edge of the screen causing it to "jump" a little as the turntable rotates. Check that the EV3 is positioned exactly as shown in the build instructions.
- Make sure that the turntable is carefully aligned before inserting the cube as described here. This is required to ensure that the cube is positioned correcetly under the color sensor during the scan.
- Use new or well charged batteries as the reset position of the scan arm can be affected by low battery levels.
- Try the scan in dim lighting conditions as the color sensor can become saturated in bright lights.
- Try to bend the cable connecting the color sensor to the EV3 in its most natural direction (swap the two ends if necessary) and through the clip at the bottom of the scan arm to minimize any force that the cable applies to the position of the color sensor during the scan.
If this does not help, please upload a video showing a failing scan with close up views of the scan arm from different angles and the position of the color sensor over the cube as the scan arm moves and post a link on the MindCuber Facebook page and I will try to help.
Like MindCuber on Facebook to share your experiences and help each other with troubleshooting.
See more LEGO robot Rubik's Cube solvers at 水管.com/IAssemble and 水管.com/ARMflix
版权 © 2013-2015 David Gilday LEGO and MINDSTORMS are trademarks of the LEGO Group Rubik's Cube is a trademark of Seven Towns Limited Disclaimer: thoughts and opinions expressed here are my own |


 IP卡
IP卡 狗仔卡
狗仔卡 发表于 2013-10-12 23:04:05
 提升卡
提升卡 置顶卡
置顶卡 沉默卡
沉默卡 变色卡
变色卡 千斤顶
千斤顶 显身卡
显身卡 发表于 2015-1-16 13:52:36